Tenancy Handbook
Ray White Cottesloe | Mosman Park

Welcome to your tenancy
Communicating with your property manager or landlord:
It’s important to establish clear communication from the start. You can opt to receive important documents, such as your rental agreement, condition report, and inspection notices, electronically. This also applies to any notices you may need to send in return. Electronic communication provides a convenient and efficient way to keep track of important information and ensures everything is well-documented.
Understanding your bond:
When you move into a rental property, you will likely be required to pay a bond, the amount of bond payable will depend on you weekly rental amount . This bond must be lodged with the Bond Administrator within the required time frame. If you do not receive confirmation that your bond has been lodged, it’s important to follow up with the appropriate authority to ensure your payment is secure.
The condition report:
Prior to moving in, your property manager will provide you with a property condition report. This document outlines the state of the property at the beginning of your tenancy. You should carefully inspect the property, noting any existing issues or damage, and take photos to support your observations. Return a signed copy of the report within 7 Days and retain a copy for your records. This report will be essential to avoid or manage any disputes that may arise regarding the condition of the property when you move out.
Repairs and maintenance:
During your tenancy, it’s crucial to distinguish between urgent and non-urgent repairs. For non-urgent repairs, you should submit a written request Via our Maintinance system Tapi and your property manager will respond For all urgent repairs please call our
Emergency After-Hours Maintenance
For urgent maintenance issues outside of business hours, please contact our emergency after-hours number: 0461 263 799.
This number should only be used for genuine emergencies that cannot wait until the next business day.
Modifications to the property:
As a tenant, you have the right to make certain minor modifications to the property, such as installing picture hooks or child safety devices, without needing formal permission. However we do ask that you advise your Property manager of any changes as you will be required to "make good" at the end of your tenancy. While your landlord cannot unreasonably refuse requests, it’s important to ensure you comply with both your rental agreement and state regulations.
Rent increases and inspections:
Rent increases are governed by state and territory laws and can only occur under specific conditions. Rent may only be increased once every 12 months. You must receive proper notice before any rent increase.
Routine inspections must also be conducted with appropriate notice (minimum 7 Days max 14 Days), and the property manager or landlord must comply with privacy laws, respecting your right to quiet enjoyment of the property.
Ending your lease:
When it’s time to end your tenancy, either you or your property manager must give the appropriate notice in writting as required by law. If you need to vacate the property before the end of your lease, be aware that you may be required to pay break lease fees.
Returning your bond:
In preparation for your bond refund, it is important that the property is properly cleaned and any damage repaired prior to your vacating inspection. It is advisable to come to an agreement with your property manager or landlord regarding the return of your bond. If there is any dispute over the bond, you can lodge a claim with LGIRS.

CONDITION REPORT
‘HOW-TO’
What is a condition report?
A condition report is a detailed record of the property’s condition at the beginning of a rental agreement. It covers the condition of everything inside and outside the property, including all fittings and fixtures as well as the cleanliness of the property.
Why is the condition report Important?
The condition report serves as a key document in case of disputes about the bond or responsibilities for cleaning or repairs. By documenting the property’s condition at the start of the tenancy, both the tenant and the property manager or landlord have a clear reference for comparison at the end of the agreement.

How to complete the condition report:
Your property manager will provide you with one an electronic copy of the condition report before you move in. As the tenant, carefully review the report, and note any discrepancies or existing issues you notice. Add comments if necessary, and ensure both parties take dated photos of the property—particularly of any pre-existing damage. These photos should be attached to the report. You must return the signed condition report to your property manager or landlord within7 Days of recieving it.
Resolving disputes and end-of-tenancy reports:
If there’s a disagreement over the condition report, it’s important to try to resolve it directly with your property manager. At the end of the tenancy, an ‘Final inspection report’ will be completed to document the property’s state at the time of moving out. This report will be compared to the original to determine if any bond deductions are necessary for cleaning, repairs, or missing items.
YOUR RIGHT TO PRIVACY AND ENTRY
Your right to privacy:
As a tenant, you have a legal right to privacy and quiet enjoyment of your home. While your landlord or property manager may need to enter the property for various reasons, strict legal guidelines govern when and how they can do so.
When can the landlord enter?
Your landlord orproperty manager can only enter your property under certain circumstances, and these are outlined in the RTA (WA) some common reasons include:
- Showing the property to prospective renters or buyers
- Carrying out a property valuation
- Taking photos or videos for advertising
- Carrying out repairs or maintenance
- Conducting routine inspections
They must provide you with proper written notice that clearly explains the reason for entry.
Your rights during entry:
When the landlord or property manager enters your home, they must do so in a respectful and reasonable manner. They should not remain on the property longer than necessary.

REPORTING MAINTENANCE
Understanding urgent vs. non-urgent repairs:
Repairs in rental properties fall into two categories: urgent and non-urgent. Urgent repairs are issues that affect the safety or livability of the property and must be dealt with immediately. Examples include burst water pipes, gas leaks, and dangerous electrical faults. Non-urgent repairs, such as a broken dishwasher or loose tiles, are less critical and must be attended to within a reasonable timeframe.
Reporting repairs: TAPI
Two Ways to report maintenance from now on using TAPI:
1) Via our website to log the maintenance job
TAPI
Select ‘Rent’ from the menu
then select ‘log a maintenance request’
OR
2) Via the QR code:
You can scan the QR code via your mobile phone's camera to lodge maintenance.
(QR code will be located on the inside of the kitchen cupboard door beneath the sink)
Paying rent during repairs:
Even while waiting for repairs, you must continue to pay your rent. However, if the repair issue remains unresolved for an extended period, it is important to know that even while waiting for repairs, you must continue to pay your rent. If your request goes unanswered or the matter isn't resolved for an extended period of time, you may apply for the repairs to be completed through your local tribunal.
EMERGENCY REPAIRS
What are urgent repairs?
Urgent or emergency repairs are issues that need immediate attention because they make your home unsafe or unlivable. These include problems such as burst water pipes, gas leaks, major roof leaks, dangerous electrical faults, or breakdowns of essential services like heating, cooling, or hot water. These repairs must be made as soon as possible under tenancy laws.
Reporting urgent repairs:
If you encounter an urgent repair, contact your property manager right away by phone if out of Business Hours Call 0461 263 799.
Ensure you leave a voicemail or send a text if phone is unattended.
What to do if urgent repairs aren’t addressed:
If your property manager doesn’t respond to an urgent repair immediately.
If the repair is urgent and still not addressed you can organise and pay for the repair yourself with reimbursement from the Landlord, however you must use a licenced contractor and show records of how you tried to reach your property manager.

OVERDUE RENT
What to do if rent is overdue:
It is important to understand your rent is due in advance.
If your rent is overdue and you’re unable to make a payment, it’s important to contact your property manager immediately. You may also receive regular rent arrears reminders from your property manager for your rent not being paid when due. Be honest about your situation and try to negotiate a payment plan, such as making smaller, more frequent payments to catch up. Make sure your offer is realistic, and always put any agreement in writing to protect yourself.
Understanding notices to vacate:
If your rent remains unpaid for a certain period, your landlord may issue a breach notice notice failure to remedy the breach could result in a termination notice. This gives you a limited time to pay the overdue amount before further action, such as applying for a court hearing, is taken.
What happens if a possession order is made?
If a possession hearing is held and a termination order is issued, your landlord can take steps to enforce it, potentially leading to eviction.
MOVING OUT OF A RENTAL PROPERTY
Ending your rental agreement:
Your rental agreement officially ends when you leave the property and hand in the keys. It’s important to pay rent until the end of your notice period or until you’ve returned the keys, whichever is later. Be sure to hand in the keys promptly, as failure to return keys on your vacating date will result in additional rental charges up until the day they are returned. If keys are not going to be returned on your tenancy end date ensure that this is communicated to your property manager as far in advance as possible.
Removing modifications and cleaning:
If you made any modifications, like installing picture hooks, make sure to remove them and restore the property to its original condition, unless your landlord has agreed that restoration isn’t necessary. If you require recommendations for trades or cleaning, contact your property manager for advice. When it comes to cleaning and gardening (if applicable) use your entry condition report as a guide to return the property as far as possible in the same condition as at the start of your tenancy.
Handling damage and final inspection:
Take care to avoid damaging the property, and note that normal wear and tear isn’t considered damage. If the landlord believes you caused damage, they might ask you to repair it or claim costs from your bond. Before returning the keys, take photos and videos of the entire property to document its condition. The property manager will conduct a final inspection.
Disconnecting utilities and redirecting mail:
Arrange to close and finalise your accounts for utilities like gas, water, electricity, and internet by your move-out date. Also, remember to redirect your mail through Australia Post and provide a forwarding address to your rental provider.
PETS

Pets and your tenancy:
what you need to know
Getting a new pet:
Before bringing a new pet into your rental property, you must obtain your landlord's consent. You need to fill out a separate form for each pet you wish to keep.
Keeping your pet responsibly:
Once you have a pet, it’s important to ensure it doesn’t cause damage, create a nuisance, or prevent you from keeping the property reasonably clean. If your pet does cause issues, your landlord may issue a breach notice, requiring you to address the problem. If the issue isn’t resolved, they can escalate the matter to court.
fair wear and tear explained
What is fair wear and tear?
Fair wear and tear refers to the natural and gradual deterioration of a property and its fixtures due to normal use over time. This could include things like faded paint, minor scuffs on walls, or worn carpets in high-traffic areas. These are all considered normal, unavoidable outcomes of living in a space.
What constitutes damage?
Damage, on the other hand, is when specific incidents or actions cause damage beyond what is considered normal use. Examples of damage include burns or cuts on kitchen countertops, holes in walls from nails or hooks, or stains on carpets from spills or pets. Unlike fair wear and tear, damage is usually the result of negligence or accidents and may require compensation from the tenant.
Examples of fair wear and tear vs. damage:
To give you a clearer picture, here are some examples:
- Faded curtains or blinds fall under wear and tear, whilst torn curtains are considered damage
- Traffic wear on carpets falls under wear and tear, whilst large stains or burns are considered damage
- Minor marks or scuffs on walls are also considered fair wear and tear, whilst holes in walls or damage from picture hooks are damage
Depreciation and compensation:
When assessing potential compensation for damage, it’s essential to consider the age of the property and its fixtures. Over time, even well-maintained items will depreciate. When a dispute is escalated to the relevant Tribunal, depreciation of the item will be taken into account when resolving disputes, ensuring that compensation claims are fair.
Understanding the difference between fair wear and tear and damage is key to effectively managing and renting a rental property.


ROUTINE INSPECTION
How to prepare for a routine inspection
What is a routine inspection?
A routine inspection is conducted by your property manager to check that the property is well-maintained. The focus is on the property's overall condition, including any damages or safety issues, rather than just cleanliness.
Frequency of inspections:
Our first routine inspection will take place approximately six weeks after the start of your tenancy. Following that, inspections will be scheduled every three months. Your property manager will provide you with 7 to 14 days' notice prior to each inspection.
If you need to reschedule for any reason, please contact your property manager as soon as possible so an alternative time can be arranged.
Preparing for the inspection:
Here’s what to focus on inside and outside the property:
Inside the home:
- Ensure the property is generally tidy and presentable
- Check for leaks from taps or sinks and report them if necessary
- Clean the kitchen, including the oven, stovetop, and sink
- Look for any damage to floors, carpets, or tiles
- Make sure all lights and switches are working
Outside the home:
- Maintain the garden and lawn areas
- Ensure locks and handles on doors and gates are functioning properly
- Clear any cobwebs and tidy up patios or balconies
Reporting issues:
During the inspection, your property manager will note any issues. It’s also helpful to report any problems you’ve noticed, like a leaky tap or a broken appliance, so they can be addressed promptly.
After the inspection:
If everything is in order, the inspection will be straightforward. If there are any maintenance issues or damages, your property manager may arrange for repairs.
CLEANLINESS AND MAINTAINING A PROPERTY

Understanding cleanliness requirements:
First, let’s talk about what the law says. Under the relevant tenancies act, landlords are required to ensure that the property is in a clean condition at the start of a tenancy. But what does clean actually mean? The term isn’t just about having a spotless home; it’s about meeting a community standard of cleanliness that ensures the property is safe and habitable.
Key areas of focus:
Here’s a quick rundown of what’s expected:
- Kitchen: cooking appliances like ovens and stovetops should be free of grease, oil, and food stains. The dishwasher, if provided, should be clean and free from food scraps and odours
- Bathrooms: sinks, toilets, and showers should be clean, with no soap scum, mould, or dirt
- Floors and Carpets: floors should be washed, and carpets should be free from stains, pet hair, and strong odours
- Windows and blinds: windows, including ground-floor external ones, should be free from smears, dirt, and dust. Blinds and curtains should be clean and stain-free
- Outdoor areas: lawns should be mowed, and garden beds should be neat and weed-free unless specified otherwise in the rental agreement.
The importance of the property condition report:
The property condition report plays a crucial role in ensuring clarity between all parties. This document will serve as a reference at the end of the tenancy, helping both parties agree on what “ clean” looks like based on the starting condition of the property.
Resolving disputes and keeping standards:
If any disputes arise about cleanliness at the end of the tenancy, the condition report and any photographs taken at the start will be crucial. Remember, cleanliness isn’t about achieving a pristine condition but rather ensuring the property is left in a state that matches how it was provided, accounting for fair wear and tear.

HOW TO TROUBLESHOOT
AND MAINTAIN YOUR DISHWASHER
Dishes still dirty after a wash?
If your dishes are still dirty after a wash, the first step is to make sure that all food has been rinsed off before placing them in the dishwasher. Leftover food can clog the filter and affect the dishwasher’s performance. If you don’t plan to run the dishwasher immediately, consider running a pre-rinse cycle to prevent food particles from drying and hardening on the dishes.
If your dishes are still coming out dirty, it could be due to a clogged filter. A dirty filter can block water flow and prevent your dishwasher from cleaning effectively. To clean the filter, start by removing the bottom rack of your dishwasher to access the filter, usually located at the bottom. Twist the filter counterclockwise to remove it, then rinse it under warm water to clear out any food particles. Once it’s clean, place the filter back and secure it by twisting it clockwise.
Dishwasher not turning on?
If your dishwasher isn’t turning on, the first thing to check is whether it’s properly plugged in and that the circuit breaker hasn’t tripped. If everything looks fine and it’s still not working, try resetting the dishwasher by turning it off at the power source for a few minutes, then turning it back on. If it still won’t start, it might be an issue that requires professional help, in which case you should contact your property manager.
Error codes?
If your dishwasher is displaying an error code, refer to the product manual to understand what it means. If you don’t have the manual on hand, you can usually find a digital copy online by searching for your dishwasher’s model or serial number. This number is typically located inside the door of the dishwasher. Understanding the error code will help you determine whether it’s a simple fix or if you need to call in a professional.
Regular cleaning and maintenance:
To keep your dishwasher fresh and running efficiently, it’s important to run regular cleaning cycles. Use a dishwasher cleaner or a cup of white vinegar placed in the top rack, and run a hot cycle with no dishes inside. This helps break down any grease or limescale buildup, keeping your dishwasher and drains in good health.
Don’t forget about the door and the dishwasher frame—they can also accumulate food particles and grime over time. We recommend wiping these areas down manually with a damp cloth and a mild detergent. This will help prevent odours and keep your dishwasher looking and smelling fresh.
Aim to do these cleaning tasks at least once a month to maintain optimal performance and extend the life of your dishwasher.

HOW TO CLEAN YOUR RANGE HOOD FILTER
Why it’s important:
Your range hood works hard to soak up grease and odours from cooking. It keeps your air clean by removing airborne grease, and it helps reduce excess heat, steam, and smoke while you cook. For optimal performance, clean the mesh filters every few weeks or months, depending on how often you cook.
Step 1 - Safety first:
Before you start, make sure the rangehood is switched off. Safety first!
Step 2 - Remove the filter:
Locate the filter underneath the rangehood. Most filters can be easily removed by sliding or pushing the latch. If it’s stuck, give it a gentle nudge.
Step 3 - Soak the filter:
Fill your sink or a large basin with hot water and a few drops of dishwashing liquid. Let the filter soak for 10-15 minutes to loosen the grease and grime.
Step 4 - Scrub the filter:
After soaking, gently scrub the filter with a soft brush or sponge, focusing on areas with built-up grease.
Step 5 - Rinse and dry:
Rinse the filter thoroughly with clean water to remove any soap residue. Shake off the excess water and let it air dry completely.
Step 6 - Reinstall the filter:
Once the filter is dry, slide it back into place under the rangehood, making sure it’s securely fastened.

HOW TO TROUBLESHOOT GAS COOKTOP
Step 1 - Inspect the burner heads:
If a burner won’t light, check the burner head for any food debris or residue that might be blocking the ignition. Remove the burner cap and clean it with a damp cloth. For any burnt-on debris, use a toothpick to clean out the small indents in the burner head, then wash it in soapy water. Make sure everything is completely dry before reassembling.
Step 2 - Check the ignition system:
If the burner still doesn’t light, there may be an issue with the ignition system. Ensure the ignition switch or button is clean and dry. If the spark is weak or not working, it could be due to dirt or moisture. Wipe the ignition area with a dry cloth to remove any moisture or residue.
Step 3 - Look for even heating issues:
If your burners are lighting but not heating evenly, check if the burner caps are properly aligned. Ensure that the burner cap and burner head are positioned correctly. Misalignment can cause uneven heating or flame distribution.
Step 4 - Examine the gas line:
If you’ve checked the above steps and the cooktop is still having issues, inspect the gas line for any visible damage or leaks. Remove the burner cap and head to reveal the gas line, which is a small hole in the centre or to the side of the burner. Gently clean with a toothpick to remove any debris which may be trapped. If you suspect a gas leak, do not use the cooktop and contact your property manager immediately. Gas leaks are dangerous and require prompt attention.
Still having problems?
If you’ve tried these troubleshooting steps and your gas cooktop is still not working correctly, it may require professional repair. Please Log this through your TAPI maintinance system.

HOW TO CLEAN AND MAINTAIN YOUR OVEN
Step 1 - Gather your supplies:
Before you begin, gather the necessary supplies: a mild detergent, baking soda, white vinegar, a sponge or cloth, a brush, and a vacuum or handheld broom for crumbs. Having these items ready will make the process smoother.
Step 2 - Remove oven racks:
Start by removing the oven racks. Take them out carefully and set them aside. You can clean them separately in the sink with warm, soapy water. Use a sponge or brush to scrub away any food residue. Rinse thoroughly and let them dry.
Step 3 - Clean the interior:
Next, clean the interior of the oven. For baked-on grime, make a paste with baking soda and water, or a non-abrasive oven cleaner of your choice. Apply the paste to the interior surfaces, avoiding the heating elements. Let it sit for at least 15 minutes to loosen the grime. Then, wipe it away with a damp cloth or sponge. For stubborn spots, use a brush to gently scrub.
Step 4 - Clean the oven door:
Clean the oven door with a mixture of mild detergent and water, or a non-abrasive oven cleaner of your choice. Use a sponge or cloth to wipe down the glass and surrounding area. Apply, let it sit for a few minutes, then wipe clean.
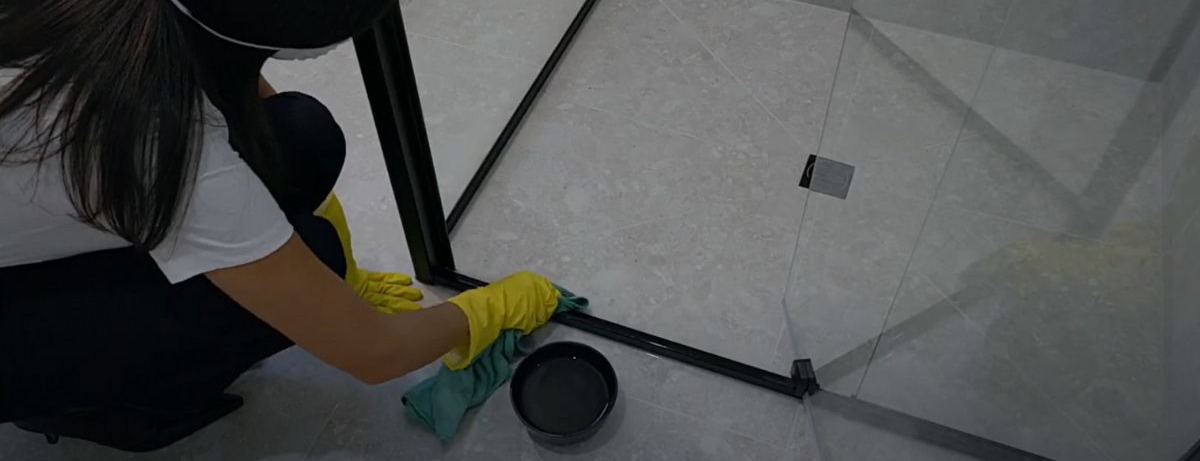
HOW TO EFFECTIVELY CLEAN YOUR SHOWER
Step 1 - Gather your supplies:
Before you start, gather your cleaning supplies: a mild detergent or shower cleaner, baking soda, white vinegar, a sponge or scrub brush, a squeegee, and a microfiber cloth. Having everything ready will make the process more efficient.
Step 2 - Remove items from the shower:
Take out any items from the shower, such as soap dishes, shampoo bottles, and any other accessories. This will give you clear access to all surfaces that need cleaning.
Step 3 - Rinse the shower surfaces:
Start by rinsing the shower walls and floor with warm water. This helps to loosen and remove any loose dirt or soap scum, making it easier to clean the surfaces thoroughly.
Step 4 - Clean the shower walls:
Apply a mild detergent or shower cleaner to the walls. For grout or tile surfaces, sprinkle some baking soda on the sponge or scrub brush for added cleaning power. Scrub the walls in a circular motion, paying extra attention to areas with soap scum or mildew. Rinse thoroughly with warm water.
Step 5 - Clean the shower floor:
Apply your cleaner to the shower floor, and use a sponge or brush to scrub away any grime or buildup. For stubborn stains or soap scum, sprinkle baking soda directly on the floor and scrub with your brush. Rinse the floor with warm water, ensuring all cleaning products are washed away.
Step 6 - Clean the shower doors or curtain:
For glass shower doors, use a glass cleaner or a mixture of equal parts water and white vinegar. Spray the solution onto the doors and wipe with a microfiber cloth or squeegee to remove water spots and soap scum. For fabric shower curtains, wash according to the manufacturer’s instructions, or replace if necessary.
Step 7 - Clean the shower fixtures:
Wipe down the showerhead, faucet handles, and other fixtures with a damp cloth. For hard water stains, you can use a mixture of equal parts vinegar and water. Soak a cloth in the solution, wrap it around the fixtures, and let it sit for about 15 minutes before wiping it clean.
Step 8 - Dry the shower:
Use a squeegee or dry towel to remove excess water from the shower walls, floor, and doors. This helps to prevent water spots and mildew buildup. Ensure everything is completely dry before putting items back in the shower.
Step 9 - Regular maintenance tips:
To keep your shower looking great between deep cleans, rinse the surfaces after each use and wipe down the glass and fixtures with a squeegee. Regularly clean your shower to prevent soap scum and mildew from building up.
HOW TO TROUBLESHOOT A RUNNING TOILET
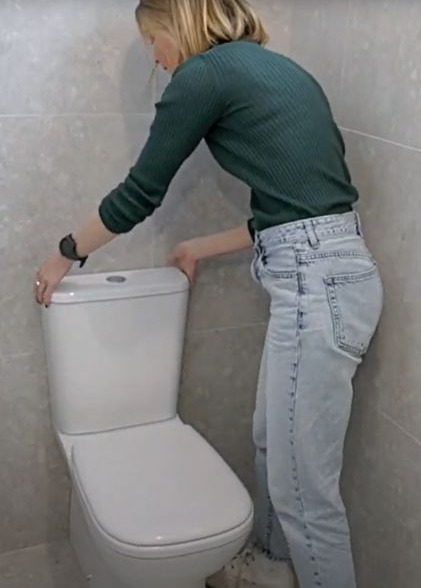
Step 1 - Locate the isolation tap:
First, find the isolation tap for your toilet. This tap is usually located near the base of the toilet, behind it, or sometimes on the wall behind the toilet. It’s a small valve that controls the flow of water to the toilet. (If isolation tap is not at the base of the toilet, open the top to check if it’s in there).
Step 2 - Turn off the water supply:
To stop the toilet from running, turn the isolation tap clockwise to close it. This will shut off the water supply to the toilet. You may need to use a bit of force, but be careful not to over-tighten it.
Step 3 - Contact your property manager:
Now that the water has been isolated, reducing any impact on your water bill, please contact your property manager via theTAPI Maintenance System. They can arrange for a plumber to address the repair.

HOW TO CLEAN YOUR BATHROOM EXHAUST FAN
Step 1 - Accessing the fan:
Before you begin, make sure that the bathroom exhaust fan is turned off. Next, carefully remove the cover of the exhaust fan. Most covers can be easily removed by pulling down gently and squeezing the sides to release the clips. If the cover is secured with screws, use a screwdriver to remove them.
Step 2 - Clean the fan cover:
Once the cover is off, you’ll likely see dust and debris built up on it. Take the cover to a sink and wash it with warm, soapy water. Use a soft brush or cloth to scrub away any grime. Rinse thoroughly and let it dry completely before reattaching.
Step 3 - Vacuum the fan housing:
With the cover removed, use a vacuum cleaner with a brush attachment to carefully vacuum the fan blades and the surrounding housing. Be gentle to avoid damaging the fan. Removing dust and debris from the blades will help the fan run more efficiently and reduce noise.
Step 4 - Wipe down the fan blades:
For a more thorough clean, you can use a damp cloth to wipe down the fan blades. Be sure to wring out the cloth well, so it’s not too wet. Wipe each blade carefully to remove any remaining dust or dirt.
Step 5 - Reattach the fan cover:
Once everything is clean and dry, reattach the fan cover by snapping it back into place or securing it with screws. Make sure it’s firmly in place before turning the exhaust fan on.

HOW TO CHANGE YOUR SMOKE ALARM BATTERY
Step 1 - Understanding your smoke alarm:
If your smoke alarm starts chirping, it’s usually a sign that the backup battery is low.
Step 2 - Safety first:
If you have a battery operated smoke alarm, make sure you have a fresh 9-volt battery or the specific type recommended by the manufacturer. If you need to use a ladder, ensure it’s stable and placed on a flat surface. Always follow the safety guidelines when working at height.
Step 3 - Locate the smoke alarm:
Find the smoke alarm that’s chirping or due for a battery change. Unclip the smoke alarm from the ceiling. Most smoke alarms have a small door or panel that covers the battery compartment at the rear of the alarm. You can usually open this by sliding or gently prying it open with your fingers.
Step 4 - Replace the battery:
Once the compartment is open, carefully remove the old battery. Insert the new battery, ensuring the positive and negative terminals align with the markings inside the compartment. Once the battery is in place, close the battery compartment door securely.
Step 6 - Test the smoke alarm:
After replacing the battery, press the test button on the smoke alarm to ensure it’s working properly. You should hear a loud beep, which indicates that the alarm is functioning correctly. Re-fit the battery back into the ceiling bracket.
Step 7 - Silencing a chirping smoke alarm:
If your smoke alarm is chirping, replacing the battery should stop the noise. If it continues to chirp after replacing the battery, double-check that the battery is installed correctly and that the compartment is fully closed. Some alarms may require a reset—this can usually be done by pressing and holding the test button for a few seconds.
Step 8 - Regular maintenance:
To keep your smoke alarms in top condition, test them monthly and replace the battery every six to twelve months, or as recommended by the manufacturer. Regular maintenance ensures your smoke alarms are ready to protect you and your family in case of a fire.
If you’re unable to stop the chirping or if the alarm doesn’t work even after replacing the battery, contact your property manager via TAPI Maintenance System.
HOW TO TROUBLESHOOT STIFF LOCKS
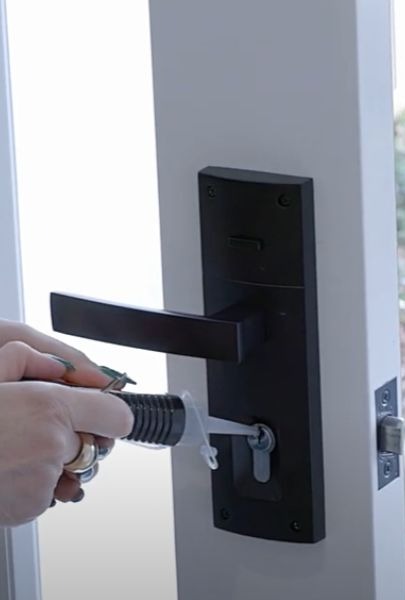
Step 1 - Check for debris:
First, check the keyhole and the lock mechanism for any visible debris or dirt. Sometimes, dust and small particles can build up and cause the lock to stiffen. Use a small brush to gently clean out the keyhole and surrounding area.
Step 2 - Lubricate the lock:
Next, it’s time to lubricate the lock. Use a graphite-based lubricant or a silicone spray, which are ideal for locks. Avoid using oil-based lubricants like WD-40, as they can attract dirt and make the problem worse over time. Apply a small amount of lubricant into the keyhole and the key slot, then insert and turn the key a few times to distribute the lubricant evenly. Wipe away any excess lubricant with a clean cloth.
Step 3 - Check the alignment:
If the lock is still stiff, check if the door and lock are properly aligned. Sometimes, a misalignment can cause friction and make the lock harder to turn. Close the door and see if the latch lines up correctly with the strike plate. If it’s misaligned, you might need to adjust the strike plate or the hinges slightly. This can often be done with a screwdriver.
Step 4 - Inspect the key:
Sometimes the issue might be with the key itself. Inspect the key for any signs of wear or damage. If the key is bent or worn down, it may not work smoothly in the lock. If you have a spare key, try using that one to see if the problem persists.
Step 5 - Seek professional help:
If you’ve tried these steps and the lock is still stiff, it might be time to call your property manager via TAPI Maintenance System to organise a locksmith. There could be an underlying issue with the lock mechanism that requires professional attention.
HOW TO RELIGHT A HOT WATER PILOT LIGHT
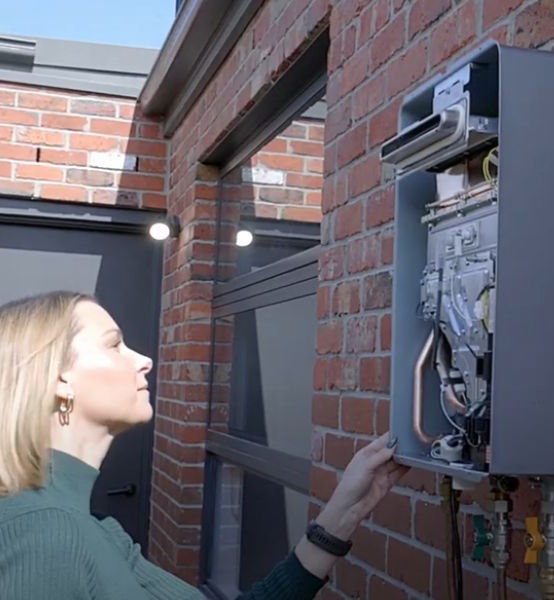
Step 1 - Safety first:
Before you begin, make sure to read the manufacturer’s instructions for your specific hot water system. Most hot water systems will list the steps you need to take to relight the pilot light in a safe manner.
If you smell gas or suspect a gas leak, do not attempt to relight the pilot light. Instead, leave the area immediately and contact your property manager, or if outside of business hours, refer to your agency's emergency trades list.
Step 2 - Restore hot water:
After following your hot water systems steps and confirming that the pilot light is functioning properly, give your hot water system some time to heat up. You should have hot water available in 30 minutes to an hour, depending on the size of your tank.
Step 3 - Electric hot water systems:
If your hot water system is electric, check your main power board to see if the circuit breaker has tripped, as well as checking the safety switch. If all switches appear on and in working order, contact your property manager or if outside of business hours, refer to your agency's emergency trades list.
HOW TO REPLACE A DOWNLIGHT GLOBE

Step 1 - Safety first:
Before you start, make sure the light is switched off. This is really important for your safety. Once the lights are off, you can remove the old globe. Downlights generally have two spring loaded arms that hold the fitting in place. Gently begin by leveraging the fitting away from the plaster ceiling using a blunt object such as a butter knife or flat head screwdriver, being careful not to damage the plaster itself. As you pull the fitting away from the ceiling, push the metal arms up to allow the LED light to easily fit come out of its socket.
Step 2 - Remove the old globe:
Now, unplug the wire connected to the back of the globe and set the old globe aside.
Step 3 - Test the new globe:
Next, let’s confirm that the problem was the globe and not the transformer. To do this, connect the new globe directly to the wire and turn the light switch back on. If the light doesn’t come on, it’s likely a transformer issue that will need an electrician’s attention. But if it does light up, we’re good to go!
Step 4 - Install the new globe:
Now that we know the globe was the issue, turn the lightswitch back off, then carefully push the newly attached globe back into the downlight fitting by turning the prongs to the right.
Step 5 - Final check:
Finally, switch the lights back on and make sure everything is working properly. And that’s it—your downlight should be back to normal!

HOW TO SAFELY REMOVE A 3M HOOK
Step 1 - Gather your supplies:
Before you begin, make sure you have everything you need. For this task, you’ll only need the original 3M adhesive hook and possibly a hairdryer if the hook has been up for a long time or if you’re concerned about the adhesive being too strong.
Step 2 - Check the hook:
Take a moment to check the condition of the hook and its surroundings. Ensure the area around the hook is clean and dry. If the hook has been on the wall for an extended period, you might want to use a hairdryer to gently warm the adhesive, making it easier to remove.
Step 3 - Remove the hook:
To remove the hook, start by holding the base of the hook gently against the wall with one hand. With your other hand, locate the adhesive strip tab at the bottom of the hook. Slowly pull the tab straight down, stretching it parallel to the wall. Pulling the tab downwards, rather than outwards, ensures that the adhesive releases cleanly without damaging the paint or wall surface.
If the adhesive is not coming off easily or if the strip breaks, use a hairdryer on a low heat setting to warm up the adhesive for about 20-30 seconds. This will soften the adhesive and make it easier to remove. After warming, try pulling the tab again.
Step 4 - Clean the surface:
Once the hook is removed, check the wall for any remaining adhesive residue. If there’s any sticky residue left, gently rub it off with your fingers or use a soft cloth with a bit of mild soap and water. Avoid using harsh chemicals that could damage the paint.
Step 5 - Inspect the wall:
After removing the hook and cleaning the area, inspect the wall to ensure no damage has been done. If the paint has lifted or there’s minor damage, take note and inform your property manager. It’s better to address any small issues sooner rather than later.
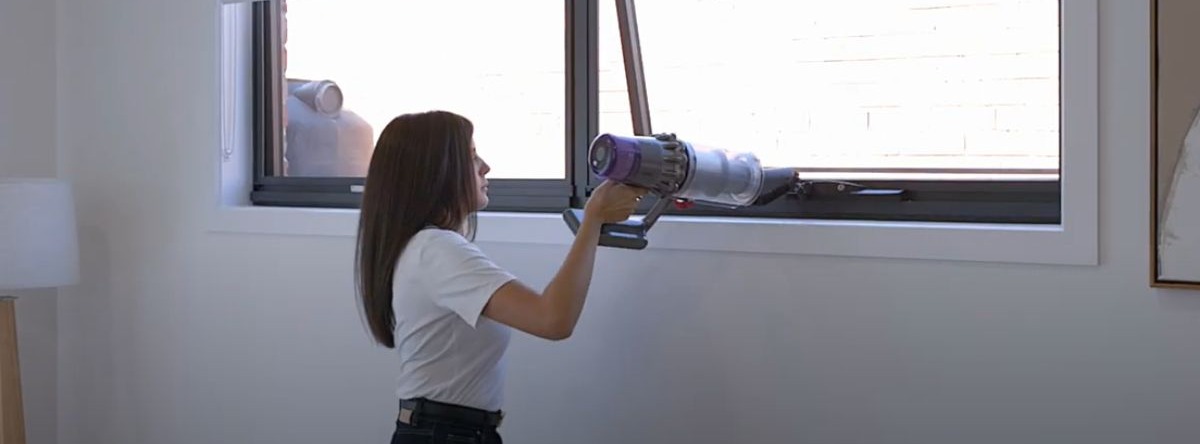
HOW TO CLEAN AND MAINTAIN WINDOW TRACKS
Step 1 - Gather your supplies:
Before you begin, make sure you have the right supplies on hand. You’ll need a vacuum cleaner with a crevice tool, a small brush (like an old toothbrush), warm soapy water, a soft cloth, and a dry towel. If you have any stubborn dirt, you might also want to grab a plastic scraper or a butter knife wrapped in a cloth.
Step 2 - Open the window:
Start by opening the window fully to expose the tracks. If your windows are particularly dirty, it’s a good idea to put down a towel or cloth on the floor beneath the window to catch any debris that might fall during cleaning.
Step 3 - Vacuum the tracks:
Use your vacuum cleaner’s crevice tool to remove loose dirt, dust, and debris from the window tracks. This step makes the deeper cleaning process easier and prevents any dirt from getting spread around.
Step 4 - Scrub the tracks:
Next, dip your small brush into warm, soapy water and scrub the window tracks thoroughly. Focus on the corners and any areas where dirt tends to accumulate. If you encounter stubborn grime, use the plastic scraper or butter knife wrapped in a cloth to gently loosen it.
Step 5 - Wipe down the tracks:
Once you’ve scrubbed the tracks, use a damp cloth to wipe away the loosened dirt and soap residue. For best results, rinse the cloth frequently in clean water as you go.
Step 6 - Dry the tracks:
After cleaning, it’s important to dry the tracks completely to prevent rust or mould. Use a dry towel to absorb any remaining moisture, making sure to get into all the nooks and crannies.
Step 7 - Maintain your window tracks:
To keep your window tracks in good condition, consider applying a small amount of lubricant, like silicone spray, to the tracks. This will help your windows slide smoothly and reduce wear and tear. Be sure to use a lubricant that’s safe for use on window tracks and won’t attract dirt.
Step 8 - Regular maintenance:
To avoid heavy buildups, clean your window tracks every few months. Regular maintenance not only keeps your windows functioning smoothly but also prolongs their lifespan and enhances the overall look of your home.

HOW TO PREVENT DAMAGE CAUSED BY PLANTS
Step 1 - Use proper containers:
One of the most important things you can do to prevent damage is to use the right containers for your plants. Always use pots with trays or saucers underneath to catch excess water. This will prevent water from seeping through and damaging floors, carpets, or window sills. Make sure the saucers are large enough to catch all the water that drains out after watering.
Step 2 - Avoid overwatering:
Overwatering is a common mistake that can lead to water damage. Be mindful of how much water your plants need and avoid letting them sit in standing water. Overwatering can lead to root rot and excess moisture, which can damage floors and walls. Use a moisture metre or simply check the soil before watering to make sure your plant actually needs it.
Step 3 - Protect your walls and floors:
If you have climbing plants or plants that tend to spread, make sure they’re not directly in contact with walls or floors. Use plant stakes, trellises, or wall protectors to keep vines and leaves off surfaces. This will help prevent stains, scratches, and mould from forming.
Step 4 - Report any issues:
If you notice any signs of damage from your plants, such as water stains, mould, or structural concerns, report it to your property manager immediately. Early intervention can help prevent further damage and reduce repair costs.
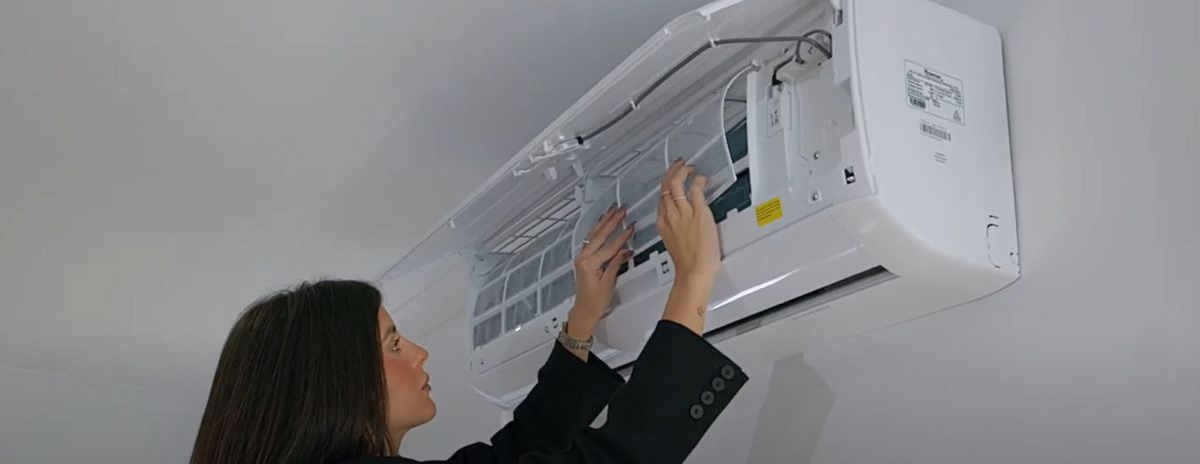
HOW TO CLEAN YOUR AIR CONDITIONER FILTER
Why clean your air conditioner filters?
Before we start, let’s talk about why it’s important to clean your air conditioner filters. Over time, dust, dirt, and debris can build up in the filters, reducing the airflow and forcing your air conditioner to work harder. This not only increases energy usage but can also shorten the lifespan of the unit. Clean filters help your air conditioner run smoothly, improve air quality, and keep your home comfortable.
Step 1 - Turn off the air conditioner:
Safety first! Before you start cleaning, make sure to turn off your air conditioner completely. You don’t want the unit running while you’re handling the filters.
Step 2 - Locate and remove the filters:
Next, locate the air filters. These are usually found behind the front cover of the indoor unit. Gently lift or slide open the cover to access the filters. Carefully remove the filters from the unit. They might be slightly dusty, so it’s a good idea to have a trash bag or cloth nearby to catch any loose dirt.
Step 3 - Clean the filters:
Once you’ve removed the filters, it’s time to clean them. Start by using a vacuum cleaner with a brush attachment to remove loose dust and debris. This should take care of the majority of the dirt.
For a deeper clean, take the filters to your sink or bathtub and rinse them under lukewarm water. Use a soft brush or sponge to gently scrub away any stubborn dirt. Avoid using hot water, as it can damage the filters. If your filters are especially dirty, you can use a mild detergent to help break down the grime. After washing, rinse thoroughly to ensure all soap is removed.
Step 4 - Let the filters dry completely:
After cleaning, allow the filters to dry completely before reinstalling them. It’s important not to put them back in the air conditioner while they’re still wet, as this can cause mould or damage to the unit. You can let them air dry naturally or use a towel to gently pat them dry.
Step 5 - Reinstall the filters:
Once the filters are completely dry, it’s time to put them back in the unit. Simply slide or place the filters back into their original position and close the front cover. Make sure the cover is securely in place.
Step 6 - Turn the air conditioner back on:
Now that your filters are clean and back in place, you can turn the air conditioner back on. You should notice improved airflow and cooling efficiency right away.
How often to clean your filters:
For optimal performance, it’s a good idea to clean your air conditioner filters every 1-2 months, depending on how often you use the unit. During peak seasons, like summer, you might want to clean them more frequently.
HOW TO SAFELY ADDRESS MOULD
Step 1 - Understand the cause of condensation:
Condensation occurs when warm, moist air comes into contact with cooler surfaces like windows, walls, or ceilings. Over time, this moisture can lead to the growth of mould, which thrives in damp environments. To effectively address mould, it’s important to first control condensation in your home.
Step 2 - Reduce moisture and improve ventilation:
Three tips to minimise condensation and prevent mould are:
- Ensure your home is well-ventilated. Open windows regularly to allow fresh air to circulate, especially in rooms where moisture is common, such as bathrooms and kitchens. Using exhaust fans while cooking or showering can also help.
- Avoid drying clothes indoors, as this can release a significant amount of moisture into the air. If you must dry clothes inside, use a well-ventilated area or a clothes dryer that vents outside.
- Maintain a consistent indoor temperature to reduce condensation. Using a dehumidifier can also help control humidity levels, especially in colder months.
Step 3 - Addressing visible mould safely:
If you spot mould in your home, it’s important to clean it promptly and safely.
Before cleaning mould, wear protective gloves, a mask, and goggles to avoid direct contact with mould spores.
Use a solution of water and mild detergent, or a vinegar-based cleaner, to clean small patches of mould. Avoid using bleach, as it can be harsh and doesn’t always penetrate porous surfaces to remove the mould completely.
Dampen a cloth with your cleaning solution and gently wipe the affected areas. Avoid scrubbing, as this can release mould spores into the air. After cleaning, dry the area thoroughly to prevent the mould from returning.
Step 4 - Preventing future mould growth:
To prevent mould from reappearing, ensure surfaces are kept dry, particularly in areas prone to moisture, such as bathrooms, kitchens, and around windows. Wipe down wet surfaces immediately after use.
Regularly check for leaks in plumbing or around windows. If you notice any leaks, report them to your property manager immediately.
Use absorbent materials like towels to wipe away condensation on windows and sills in the morning. Keeping lids on pots while cooking and covering aquariums can also help reduce moisture.
Step 5 - When to contact your property manager:
If you’re dealing with a significant mould issue, notice any black mould or notice mould returning after cleaning, it’s important to contact your property manager right away. Mould can indicate underlying issues like leaks or structural problems that need professional attention. Don’t hesitate to report any persistent dampness or mould growth so it can be addressed before it becomes a larger problem.

DOMESTIC VIOLENCE SUPPORT
Unfortunately domestic and family violence is on the rise with most incidents taking place at home. With about third of our population renting, it’s crucial to highlight your rights as a tenant to ensure your safety.
Your rights and responsibilities as a tenant:
If you or your dependent child are victims of domestic and family violence, you can end your tenancy immediately.
Depending on the legislation in your state, you may be asked to submit a specific Termination Notice and relevant supporting evidence. Please reach out to your property manager or tenancy advocacy service for guidance.
Where to go for support:
If you or your children are in immediate danger, please dial 000.
1800RESPECT - 1800 737 732
White Ribbon Australia
Australian Red Cross
Ask Izzy
Men’s Referral Service
Pets:
In an unfortunate situation where you are unable to take your pet(s) with you when leaving due to domestic or family violence, please get in touch with RSPCA (they provide assistance to house and care for pets of owners experiencing DV), Paws and recover or Lucy’s project.
Our PROPERTY MANAGEMENT team

Rachell Hannah
HEAD OF PM
Licensee

Amanda Leipold
BUSINESS DEVELOPMENT MANAGER
0455 151 000

India Rose-Birchenall
BUSINESS DEVELOPMENT MANAGER
0400 446 602

JiaJia White
Senior asset manager
0499 885 855

Michelle Blower
Asset manager
0498 880 911

Elly Tan
Asset manager
0417 737 348

Sarah Harton
ASSET MANAGER
0429 012 049

Merete Gorry
ASSET MANAGER
0400 010 776

Dianne Moran
ADMINISTRATION ASSISTANT
08 6244 7885

Isabella Hulm
ADMINISTRATION ASSISTANT
08 6244 7885

Emergency After-Hours Maintenance
0461 263 799
TESTIMONIALS

Paul Thompson
JULIET - TENANT
"Paul Thompson has been our fantastic letting agent for the past 2.5 years. In that time he has been very helpful, straightforward and proactive with fixing everything. I’ve never felt like any question is too much, and Paul has been quick to answer them all! Paul has also been open and honest, fair and respectful. After hearing horror stories about the rental market we felt grateful to have Paul as our agent.
Thanks again Paul!"

Merete Gorry
IASANTHA - TENANT
"Prompt and available any time to help and support anyone. I am an immigrant and the property manager - Merete Gorry has been immensely helpful from the day 1 that I stepped in WA. Her prompt service is much appreciated and I strongly recommend her and her property agent!"

Elly Tan
Tshering - TENANT
"Elly Tan was amazing! Approachable, friendly, and professional with clear, empathetic communication. Her humble and polite demeanor made the experience exceptional. Highly recommend!”